Migrating a website is like moving to a new house—it can bring exciting opportunities and a fresh start, such as improved user experience, updated design and functionality, and increased search engine rankings. But, just like moving to a new house, website migration can be stressful and daunting if not planned and executed correctly.
We’ll walk you through everything you need to know to ensure your successful migration. From understanding the types of migrations to creating a solid plan, we’ll help you avoid the common pitfalls and set your site up for long-term growth.
What is Website Migration?
Website migration is the process of moving a website to a new setup. These changes could be big or small. It can mean switching to a new domain, changing web hosting providers, or using a different content management system (CMS).
Whatever changes you’re making, executing your migration properly is crucial to ensure your business operates smoothly without interruptions. Equally important, you’ll want to preserve the valuable search engine visibility you’ve worked hard to achieve.
Website migration involves transferring a website to a new technical environment. This process encompasses various technical changes, from DNS modifications to complete hosting environment transitions. Common scenarios include domain transfers, Web Hosting provider changes, and Content Management System (CMS) migrations.
Types of Website Migrations
Understanding the various types of website migrations is a critical first step in ensuring a smooth transition. Each type affects your site differently, and knowing these distinctions can help you anticipate challenges and plan effectively for a successful website migration.
Let’s take a closer look at each one.

Website Redesign
If you’re redesigning your website because it feels outdated, doesn’t align with your branding, or offers a poor user experience (UX), website migration is a great chance to update key branding elements. You can improve mobile responsiveness and text readability or redesign the layout to be more user-friendly.
Site Structure Changes
Changing the structure of a website—whether altering URL hierarchies, reorganizing categories, or updating navigation menus—is a site structure migration that frequently comes with site redesigns. For example, if you decide to move a subdomain or blog from blog.mywebsite.com to mywebsite.com/blog, this would be considered a site structure change.Properly managing internal links and setting up redirects for any moved or deleted pages is essential to avoid user confusion and SEO penalties.
Switching to Another CMS
This migration occurs when a website is moved from one CMS to another, such as migrating from Shopify to WooCommerce or Wix to WordPress. Reasons for moving to another CMS platform include:
Site speed issuesPoor customer supportLimited functionalityA desire for more customization options
Content Migration
Content migration involves transferring content from one website to another, such as consolidating multiple sites or merging two companies’ websites after a merger. Carefully plan and execute this type of migration to ensure accurate content transfer without any loss.
Web Hosting Migration
Web hosting migration involves transferring a website from one server or hosting provider to another. This process can vary significantly depending on the migration type, such as cPanel to cPanel, WordPress to WordPress, or server-to-server migrations.
Below is a brief overview of each type:
cPanel to cPanel Migrations
cPanel provides a built-in tool that simplifies transferring data from one cPanel account to another. This process involves creating a full backup of your website files, databases, email accounts, and settings, then uploading the backup file to the new server and restoring it using cPanel’s restore tool.
After the migration is finished, you might need to update configuration files, clear cache, reset permalinks (especially for WordPress sites), adjust DNS settings, and re-point name servers.
WordPress to WordPress Migrations
WordPress migrations can be done in several ways, such as using a plugin or manually migrating the site. Plugins like All-in-One WP Migration and Duplicator make transferring your WordPress site to a new location easy.
Alternatively, you can manually move your WordPress site by exporting the database using FTP and then uploading it to the new hosting server. Then, you need to update the database URLs and reconfigure DNS settings.
Server-to-Server Migrations
This type of migration involves transferring an entire server setup, including the OS, databases, and web files. It is usually done when switching to a new hosting provider or upgrading to a different server. It requires advanced technical knowledge and should be performed by an experienced professional.
Does Website Migration Affect SEO?
Website migration can impact SEO temporarily (especially in the case of domain migration). Initially, seeing a short-term drop in traffic and rankings is normal as search engines re-crawl, re-index, and adapt to your site’s changes. Long-term negative impacts can sometimes result if the migration wasn’t done properly.
However, the long-term benefits can outweigh the temporary dip when done right. A successful migration can improve user experience, enhance site architecture, and boost content quality, leading to higher rankings, increased organic traffic, and stronger domain authority.
To minimize disruptions and protect your SEO, following best practices for site migration is essential.
Here is what our experts recommend for a seamless migration:
Your Ultimate Website Migration Checklist
Use this website migration checklist template to guide you through each stage of the site migration process.
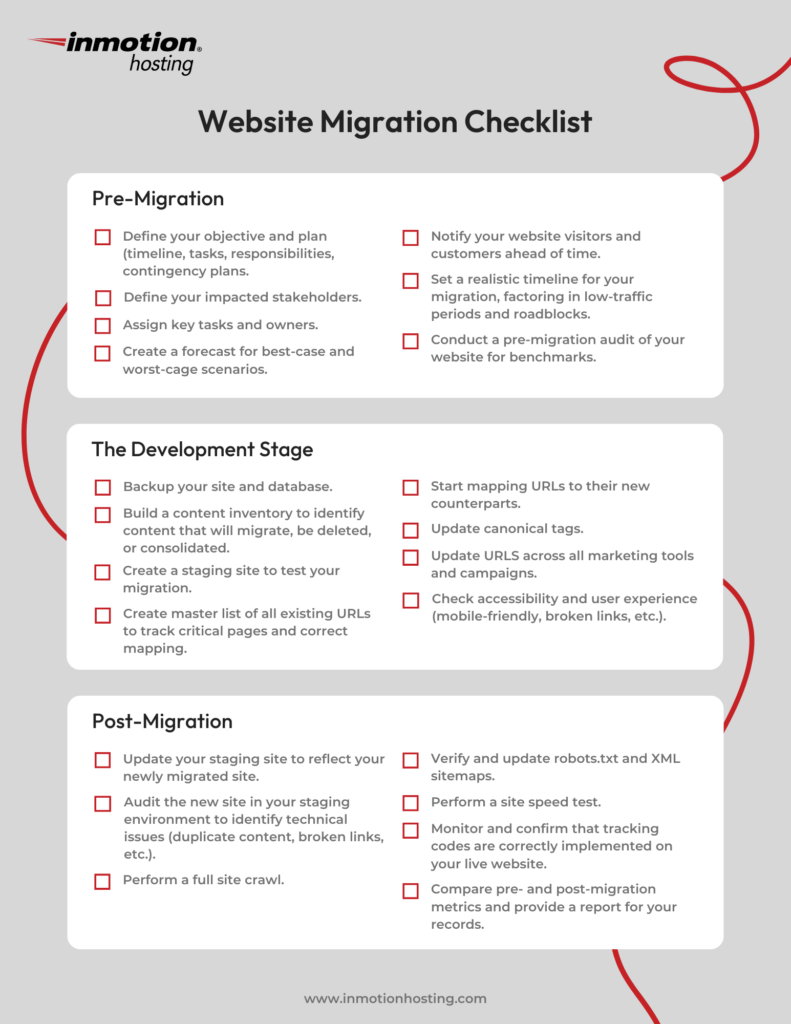
The Pre-Migration Stage
Abraham Lincoln once said, “Give me six hours to chop down a tree, and I’ll spend the first four sharpening the axe.”
The same principle applies to website migration. Spending time in the planning stage can save you from costly mistakes and headaches down the road. Consider this pre-migration checklist as part of your planning stage.
Define the Scope and Objectives
Define clear migration goals, outline its scope, and specify what you want to achieve. For example:
Improved SEOBetter user experienceEnhanced security
For example, if you’re migrating your website to a new hosting provider, check whether you will use a shared hosting, VPS, or dedicated server.
Create a Detailed Migration Plan
A project migration plan helps you stay focused, track progress, and identify potential roadblocks. It should include:
Timeline with milestones and deadlinesList of tasks and responsibilities for each team memberContingency plans
Involve Key Stakeholders Early
Migrating a website involves many steps, including technical work, design updates, and marketing tasks. The scale and needs of the migration will determine which stakeholders need to be involved. Some of the teams you can engage in include:
Web Development TeamDesign TeamContent Writers and MarketersSEO SpecialistsProject ManagementDevOpsBusiness Owners/Managers
Assign Key Tasks and Owners
Once you know who will be involved, assign key tasks to specific teams or individuals and ensure accountability for each task. It helps keep everyone aligned, minimize confusion, and prevent critical oversights that could cause delays.
Forecast the Migration’s Impact
Website migrations can be disruptive, making it crucial to assess their potential impact on your business and plan effectively. Forecasting both the best-case and worst-case scenarios can help you navigate the process with confidence.
Notify Users Ahead of Time

Notify your visitors and customers of the upcoming migration using a banner, email, or social media announcement. It will prevent confusion and show customers that you’re maintaining communication.
Set a Migration Timeline
Site migrations can be complex, but it is important to complete them as quickly as possible while setting a realistic timeline. Ideally, plan the migration during low-traffic periods to minimize disruptions. Enforce content freeze before and during migration to avoid any clashes with changes or updates that might happen during the migration.
Provide a Pre- and Post-Migration Report
Having pre- and post-migration reports can help you track your website’s performance before and after the migration. It will give you a benchmark to measure the changes’ impact on SEO, traffic, rankings, and other metrics.
Conduct a Pre-Migration Audit
Create benchmark reports and audit your website’s performance before the migration to evaluate its impact. Some areas to include in your assessment are:
Site Structure: How many clicks does it take for a user to get to a particular page?Organic Traffic: Which pages receive the most traffic, and from which sources?Page Load Time: Is your site loading quickly enough?Mobile Responsiveness: How does your site perform on mobile devices?URL Structure and Redirects: Are there any broken links or outdated redirects?Indexable URLs: How many pages are indexed?
These metrics will be your benchmark for comparing the post-migration site. Any major differences could indicate an issue that needs attention.
The Development Stage
It’s time to execute once you’ve planned and prepared for the migration. This stage involves technical implementation and testing.
Perform a Site and Database Backup
Before starting the migration project or making any changes, backup all your site files and databases to avoid losing data. This backup will be crucial in case something goes wrong during the migration.
Consider these steps for database migration:
Make a copy of the database using a plugin or your web hosting provider’s native backup manager.Select what files and folders you want to include in the backup.Decide whether to store your backup locally or in cloud storage.
Build a Content Inventory
Analyze the content on your website to decide which pages, posts, or media assets will be moved, deleted, or consolidated. This inventory can also help identify any missing content during post-migration testing and adding them post-migration becomes a more straightforward task.
Create a Staging Site
Depending on the migration type you’re performing, you may need to create a staging site. A staging site allows you to test the migration on a separate server without affecting your live site. It is particularly useful for complex migrations or those involving large amounts of data.
You can create a staging site through your hosting provider or set it up locally on your computer.
Compile All URLs
Create a master list of all existing URLs to ensure critical pages are protected or mapped correctly. Whether restructuring URLs or consolidating pages, this step is key to preserving traffic and rankings post-migration. For smaller sites, map URLs 1:1; for larger ones, prioritize high-value pages to minimize broken links and traffic loss.
Perform URL Mapping
Now that you have a list of all your existing URLs, you can start mapping them to their new counterparts. This process helps ensure that any old links or bookmarks from your previous site will redirect to the appropriate pages on your new site, reducing the chances of broken links and 404 errors that can harm SEO.
Update Canonical Tags
During migration, duplicate pages can confuse search engines, causing outdated versions to rank. Make sure to mark your new pages as canonical after migration to signal the preferred page to Google and protect your SEO rankings.
Update URLs on Your Marketing Tools
Update URLs across all marketing tools and campaigns. For example, update links in paid ads to reflect the new URLs, revise email campaigns and social media channels accordingly and verify that website analytics tools, like Google Analytics, accurately track the updated URLs.
Check Accessibility and UX

Here are some of the tasks you can do before going live:
Test the new site on different devices and browsers.Look for broken links, images, or videos overlooked during pre-migration testing.Verify that backlinks point to the correct pages and ensure all forms and interactive elements function correctly.
The Post-Migration Stage
Monitoring and reporting are essential after pre-migration. This step helps you spot and fix any performance issues. Here’s what to do once the site migration is complete:
Update Your Staging Site
If you’ve created a staging environment, ensure it reflects the newly migrated site. This step helps you identify any issues or changes that may have occurred during the live migration.
Audit the New Site in Your Staging Environment
Before going live, thoroughly review the staging site to identify and resolve potential technical issues that could disrupt the migration. Key areas to check include:
Duplicate content404 errors or broken linksIncorrectly rendered pagesMissing metadata, on-page content, or schema markupSoft 404s caused by empty pagesPage templates not aligning with wireframesInternal linking inconsistenciesMissing or incorrect canonical tags
Perform a Full Site Crawl
Use site auditing tools to identify and address broken links, missing metadata, and indexing errors. Ensure all pages are crawlable and indexed correctly.
Update robots.txt and XML Sitemaps
Verify that the robots.txt file allows search engines to access essential pages. Submit an updated XML sitemap to search engines to guide crawlers through the new site structure.
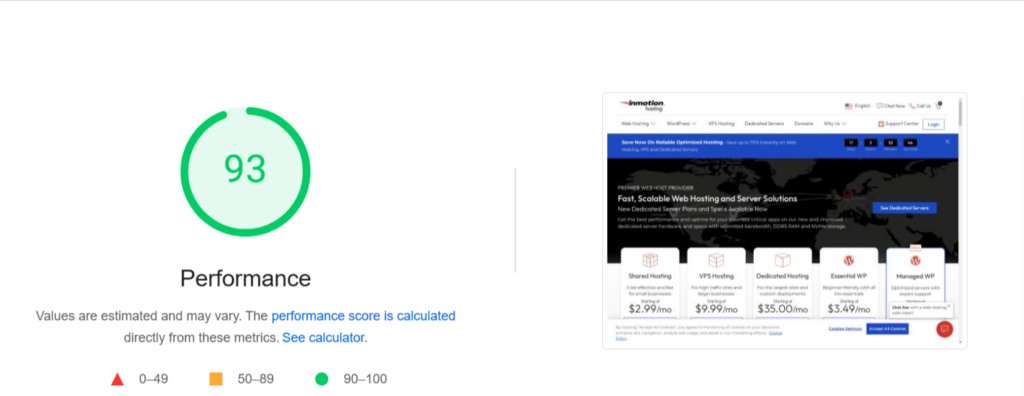
Perform Site Speed Test
Run a site speed test to ensure your new site loads quickly on mobile and desktop. The de facto tool for testing site speed is Google PageSpeed Insights. Ideally, the speed should be the same or faster than your previous site.
Monitor Tracking Codes
Confirm that all tracking codes are correctly implemented once the website is live. It includes verifying analytics tracking codes (e.g., Google Analytics) and advertising pixels (e.g., Google Ads). Additionally, annotating the date of the website migration in your analytics platform is a good practice. This simple step can significantly enhance clarity and accuracy when generating reports in the future.
Compare Pre- And Post-Migration Metrics
Evaluate key metrics against the benchmarks established during the planning phase. Look for discrepancies that may indicate issues requiring resolution. Monitor closely for any traffic or ranking changes to address promptly.
Provide Post-Migration Report
Once everything has been tested and confirmed to be working correctly, provide a post-migration report detailing the changes made during the migration process. The report must detail any issues encountered, the steps taken to resolve them, and any additional actions required. This document will serve as a valuable reference for future migrations or updates.
Implement Post-Migration Monitoring and Cleanup
Continue monitoring your site post-migration, fixing issues, and performing necessary cleanup tasks. It includes addressing broken links or missing content, updating outdated information, and ensuring all pages are properly indexed and ranked.
You can also work with your marketing team to announce the launch of the new site and share any updates with your audience. Inform them about changes to URLs or navigation and give clear instructions on how to access the new site.
Frequent Add-ons to Site Migrations
Domain Change
Domain migration happens when you want to change your website’s domain name, often due to rebranding, acquiring a premium domain, or a business merger. For example, you want to migrate from www.oldwebsite.com to www.newwebsite.com. Managing this type of migration typically involves implementing URL redirects (301 redirects) to preserve SEO rankings.
For this type of migration, you’ll also need:
DNS record configurationSSL certificate implementation301 redirect mappingServer-side redirect implementationEmail system reconfigurationSearch console property updates
Top-Level Domain Change
Unlike a domain change, which involves changing the main domain name, a top-level domain (TLD) change involves changing only the extension at the end of the domain name.
For example, you could migrate from www.mysite.com to www.mysite.net, or if your company expands internationally, you might want to migrate from www.mysite.com to mysite.co.uk.
This type of migration can impact search engine rankings and requires proper redirection to avoid losing traffic.
HTTP to HTTPS
Switching from HTTP to HTTPS involves adding an SSL certificate to your website, making it more secure. It’s crucial for websites that handle sensitive user information such as credit card details or login credentials.
Google considers HTTPS a ranking factor, making this migration beneficial for SEO. However, it’s less common today, as most websites now default to HTTPS.
A Smooth Transition For Your Site
Migrating a website can feel overwhelming, but with the right preparation and expertise, it doesn’t have to be. By following a detailed website migration checklist and addressing each step with care, you can ensure a smooth transition that preserves your site’s functionality and SEO performance.
When it comes to something as important as your website, don’t take unnecessary risks—website migrations are complicated, so trust the experts with your site—partner with InMotion Hosting to ensure a seamless migration process that keeps your website running at its best.
Frequently Asked Questions
What are the key issues to consider with site migration?
When migrating a website, you should consider potential issues and risks, such as:
Database backups: Have you backed up all content and databases to avoid data loss during the migration?Redirects: Are all old URLs mapped to their new counterparts, with proper redirects in place?Broken links and images: Do all internal links work correctly? Are there any missing or broken images?Search engine visibility: Have you submitted an updated XML sitemap to search engines? Is your robots.txt file set up correctly?User experience: Does the new site function well on different devices and browsers? Has user behavior been affected?Metrics tracking: Are analytics tags functioning correctly on all pages, including those with redirects?Content gaps: Have you conducted a thorough content inventory to ensure no content is lost during migration?Security measures: Have security measures, such as HTTPS implementation, been addressed during migration?
How do I plan a website migration?
Understanding how to migrate a website starts with a clear pre-migration checklist. This checklist includes steps for database migration, redirects, content inventory, and more. It’s also essential to involve key stakeholders early in the planning stage.
How long does a website migration take?
Migrating a small website with minimal content usually takes 30 minutes to a few hours. However, more complex migrations, such as redesigns or platform changes, can take weeks or even months of planning and coordination to ensure everything goes smoothly.
How can I migrate my website without losing SEO?
To preserve SEO during migration, use 301 redirects to map old URLs to their new counterparts. It helps search engines and users find the correct pages, maintain rankings, and retain link equity throughout the transition.
Will domain migration increase traffic?
Domain migration alone will not necessarily increase traffic. Relevance, a well-structured site, and better content are some of the factors that contribute to increased traffic.
However, domain migration can have indirect effects on SEO and user experience, which may lead to improved rankings and increased traffic over time.
Which practice should not be followed for site migration?
Skipping SEO best practices, such as setting up 301 redirects, can lead to broken links and a significant drop in search engine authority, negatively impacting your site’s traffic and rankings.
Additionally, not conducting pre- and post-migration audits can result in potential issues that could harm your site’s performance.