As WordPress experts who have helped thousands of website owners protect their website data, we know how important it is to have secure, accessible backups of your WordPress site.
Many of our readers ask us about using Amazon Simple Storage Services (S3) for their WordPress backups. They’re often unsure if it’s the right solution for their needs. We understand – backing up your WordPress site shouldn’t feel like solving a puzzle.
That’s why we’ve created this complete guide to help you back up WordPress to Amazon S3, whether you’re a beginner or an experienced user. We will walk you through everything step-by-step, using simple, clear instructions that anyone can follow.
In this guide, you’ll learn how to back up your WordPress and send its files to Amazon S3.
Why Use Amazon S3 to Backup WordPress?
We’ve helped thousands of WordPress users backup and restore their websites. And Amazon S3 offers some unique advantages that make it stand out from other cloud backup storage options like Google Drive or OneDrive.
Amazon S3 is particularly suitable for websites that need enterprise-level backup reliability. It can handle large backup files consistently, regardless of when you run your backups. This makes it perfect for business websites that can’t afford backup failures.
The security features in S3 go beyond basic file sharing. While services like Google Drive and OneDrive offer simple sharing options, S3 provides enterprise-level security through IAM (Identity and Access Management).
This lets you create specific security rules, like restricting access to certain time periods or applying automatic encryption to your backup files.
Amazon offers a free tier that includes 5 GB of storage, along with 2,000 PUT and 20,000 GET requests monthly for your first year.
In practical terms, this means you could store several complete backups of a small WordPress site and perform regular backups without extra costs during that period.
When it comes to pricing, S3 uses a flexible pay-as-you-go model with different storage classes. This means you can choose more affordable options for long-term backup storage while keeping recent backups readily available.
With all these benefits in mind, let’s look at how to send your WordPress backups to Amazon S3. You can use the quick links below to jump to the section you need:
First Things First: Configure Your Amazon S3 Account
Before we can back up your WordPress site to Amazon S3, we need to set up your storage space correctly.
Step 1: Create an Amazon S3 Bucket
First, log in to your Amazon Web Services (AWS) account. Then, click on the menu button at the top left corner and select ‘S3.’
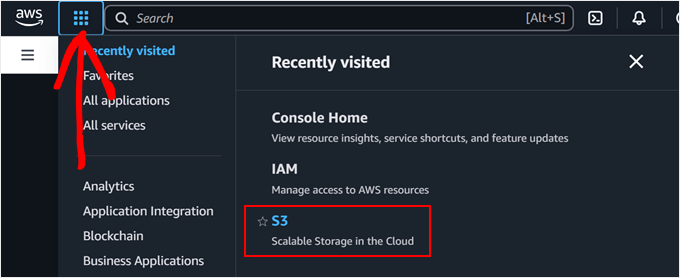

On the S3 dashboard page, you need to look for the ‘Create bucket’ button and click it.
A bucket in Amazon S3 is like a container for your files. Think of it as a special folder that will hold all your WordPress backups.


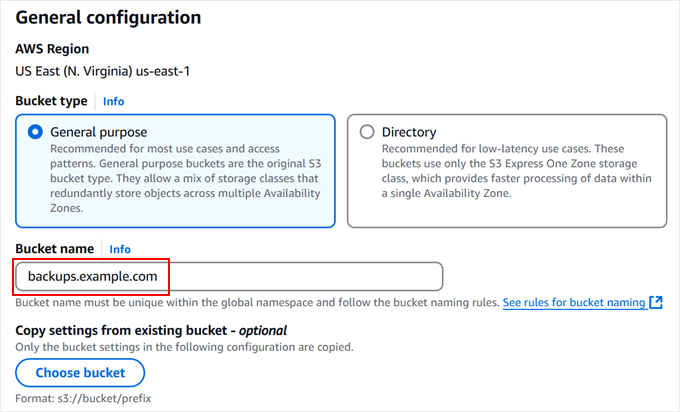
For the ‘Bucket type,’ you need to choose ‘General purpose.’ Then, give your bucket a name.
We recommend including your domain name in the name, with something like backups.yourwebsite.com as your bucket name. This format ensures your bucket name is unique and helps you easily identify your WordPress backup files later.
You’ll also see several configuration options. For most WordPress backup needs, you can leave these settings at their default values. These defaults include keeping your bucket private and enabling encryption for better security.

At this stage, you can just scroll to the bottom of the page and click the ‘Create bucket’ button.
Your new storage space will be ready in just a few seconds.


Step 2: Create a Security Policy
Now, let’s set up a security policy for your backups. This policy is a set of rules that control what can be done with your backup files.
Start by clicking on the menu again and selecting ‘IAM.’ This will take you to AWS’s security management area.
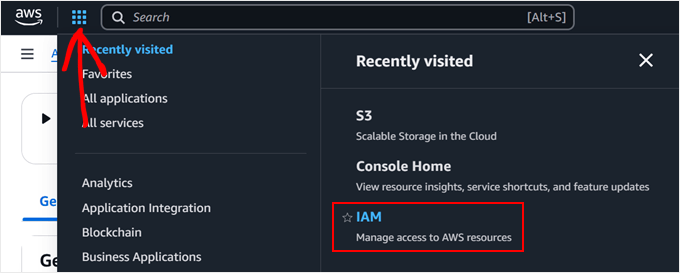

You can navigate to the ‘Policies’ page from here.
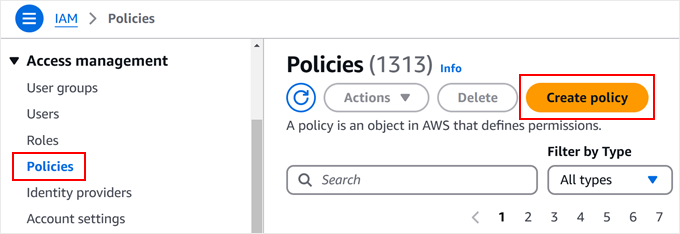
Here, you need to click on the ‘Create policy’ button. This is where you’ll set up your backup permissions.

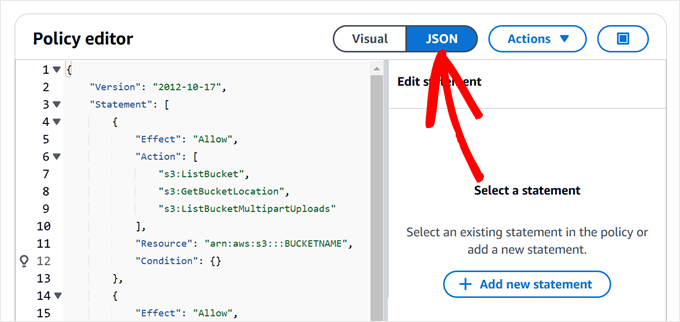
When you see the policy editor, you can select the ‘JSON’ tab to enter the security rules.
Here’s where you’ll add the special permission code. You can copy and paste the policy below into the editor:
“Version”: “2012-10-17”,
“Statement”: [
{
“Effect”: “Allow”,
“Action”: [
“s3:ListBucket”,
“s3:GetBucketLocation”,
“s3:ListBucketMultipartUploads”
],
“Resource”: “arn:aws:s3:::BUCKETNAME”,
“Condition”: {}
},
{
“Effect”: “Allow”,
“Action”: [
“s3:AbortMultipartUpload”,
“s3:DeleteObject”,
“s3:DeleteObjectVersion”,
“s3:GetObject”,
“s3:GetObjectAcl”,
“s3:GetObjectVersion”,
“s3:GetObjectVersionAcl”,
“s3:PutObject”,
“s3:PutObjectAcl”
],
“Resource”: “arn:aws:s3:::BUCKETNAME/*”,
“Condition”: {}
},
{
“Effect”: “Allow”,
“Action”: “s3:ListAllMyBuckets”,
“Resource”: “*”,
“Condition”: {}
}
]
}
Important! You’ll need to replace all instances of ‘BUCKETNAME’ with the actual bucket name that you created earlier. For example, if your bucket is named backups.example.com, then you’ll want to update both instances of BUCKETNAME with that exact name.

At this stage, you can move down the page.
Then, click ‘Next.’


Now, you can give your policy a friendly name. You might want to call it something like WordPress-Backup-Policy, Duplicator-Backup-Policy, or Updraftplus-Backup-Policy.
Feel free to choose a name that makes sense to you. This policy will work great with either WordPress backup plugin we will cover later.
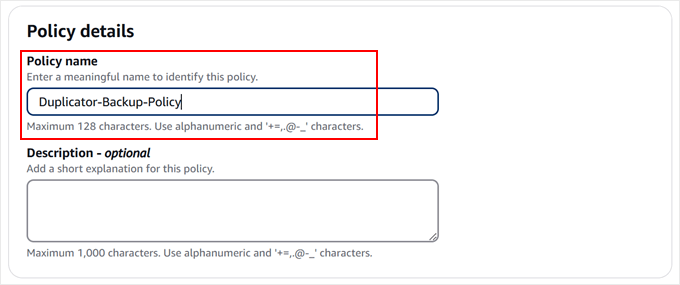

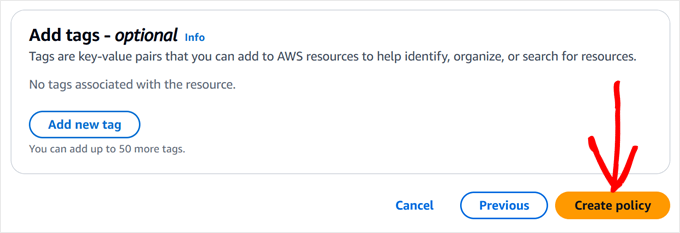
Once you’re happy with the name, you can finish up by clicking ‘Create policy.’
This will save all your security settings and get you ready for the next step.

Step 3: Create a User
Now that we’ve set up our security policy, let’s create a user who can access your cloud storage. You can think of this as creating a special account just for handling your WordPress backups.
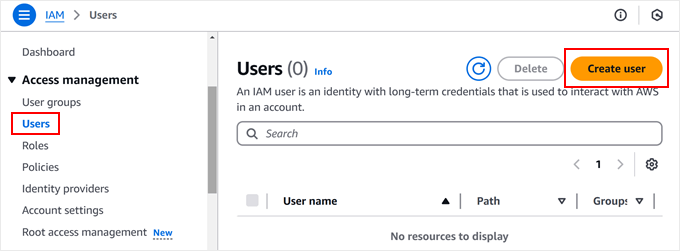
Start by going to the ‘Users’ menu on the IAM page. You’ll see a ‘Create user’ button. Go ahead and click that.

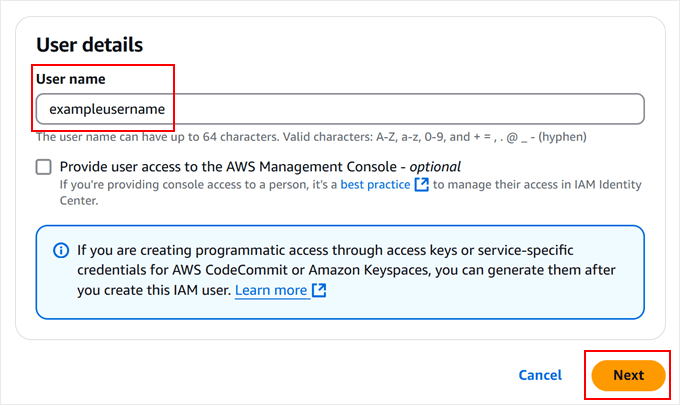
Next, you’ll give your new user a name.
You can name any name that helps you identify its purpose. Then, click ‘Next.’

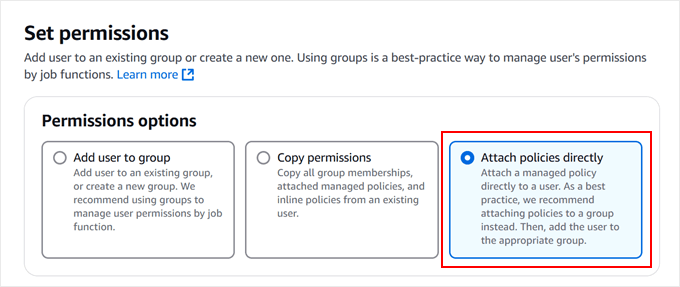
When you reach the ‘Set permissions’ section, you’ll want to select ‘Attach policies directly.’
This is where you can connect the security policy we just created to your new user. Think of it as giving your backup user their specific set of permissions.

Look through the list of policies until you find the one we created in the previous step. You can easily find it by typing the policy name in the search box.
Once you spot it, just check the box next to it.
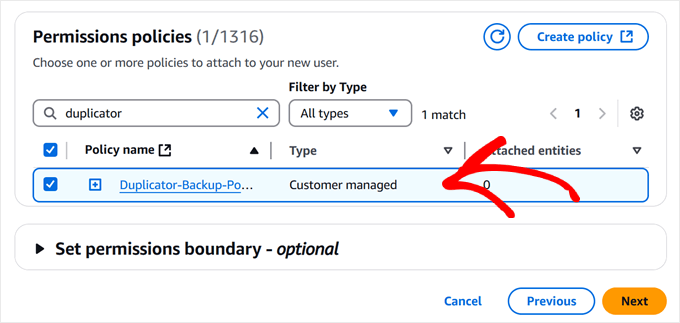

After reviewing everything, you can scroll down and click ‘Create user.’
AWS will set up your new user with all the right permissions to handle your WordPress backups safely.
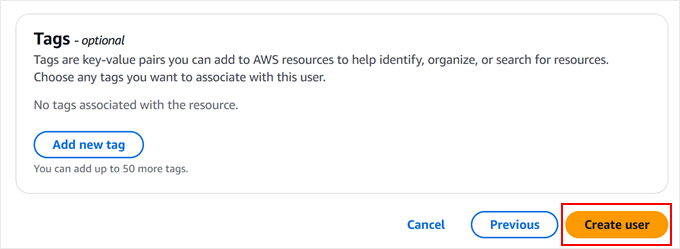

Keep in mind that we’ll need to grab some important security details for this user in the next step, so don’t close this window just yet.
Step 4: Copy Your Access Keys
Let’s set up your access keys. These are like special passwords that will let your WordPress backup plugin connect securely with Amazon S3.
First, you can click on the username we just created to view its details.


Look for the ‘Security credentials’ tab.
This is where we’ll create your access keys.
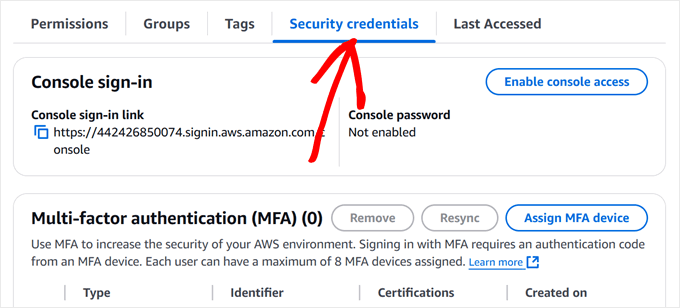

Move down the page slightly.
When you see the ‘Create access key’ button, go ahead and click on it.


Amazon will now ask about your use case.
Since we’re planning to use a WordPress backup plugin, you can select ‘Third-party service’ from the options.
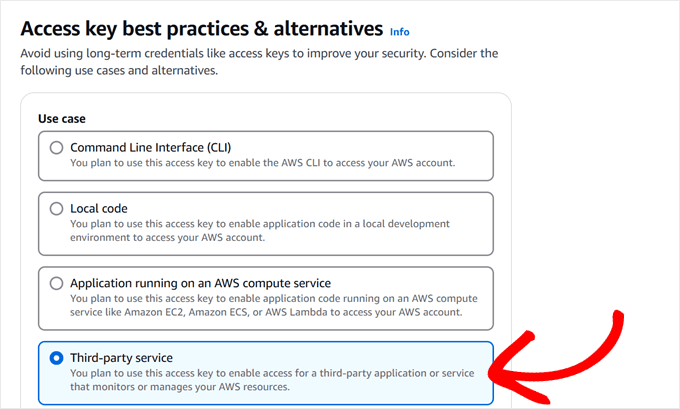

Now, scroll down the page further.
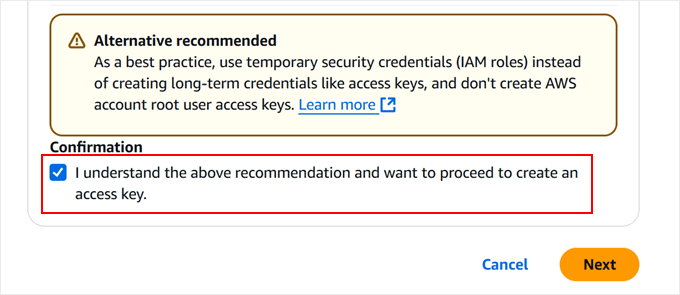
Check off the box next to ‘I understand the above recommendation and want to proceed to create an access key’ and click ‘Next.’

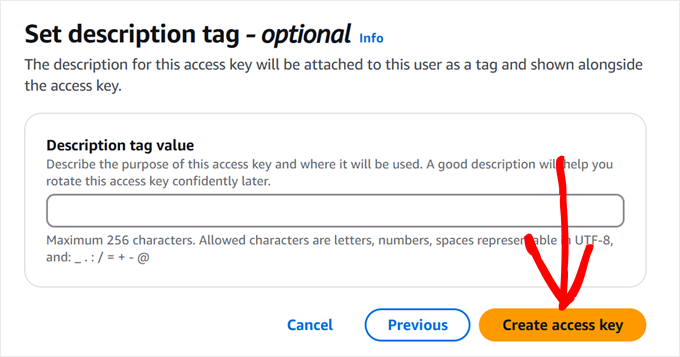
Before you’ll see your access keys, you can optionally set some description tags.
We’re going to skip this step as it’s not necessary, so go ahead and click on the ‘Create access key’ button.

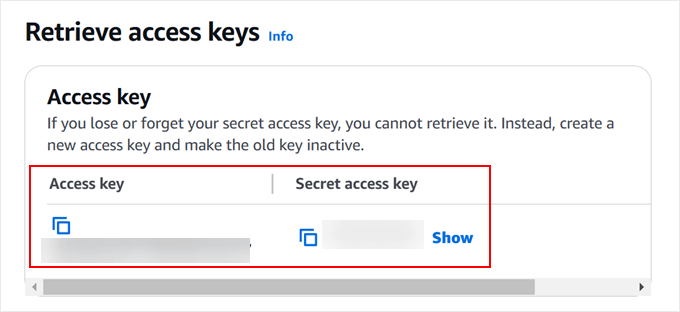
You’ll now see two important pieces of information: your access key ID and your secret access key. Think of these as a username and password pair that your backup plugin will use.
You’ll want to keep these keys somewhere safe, or at least keep this window open while you set up your chosen backup method. Once you close this window, you won’t be able to see the secret access key again.

Method 1: Use Duplicator to Backup WordPress to S3 (More Customizable)
In our experience, we’ve found Duplicator to be the most reliable solution for Amazon S3 backups. We use it ourselves to back up some of our partner websites and personal projects, so we’re confident in recommending it as our top choice.
What makes Duplicator stand out is its powerful feature set. You can schedule automatic backups, migrate your entire WordPress website, and connect to multiple cloud storage services all from one dashboard. Plus, its Amazon S3 integration is rock-solid and well-tested.
While you can explore our detailed Duplicator review for a complete feature breakdown, let’s focus on getting your S3 backups set up.
Keep in mind that you’ll need Duplicator Pro for the Amazon S3 integration, but you can start with the free version to get familiar with the basic features.
Step 1: Install and Activate Duplicator
Getting started is straightforward. You’ll need to install Duplicator on your WordPress website first. If you’re new to installing WordPress plugins, don’t worry. We’ve got a beginner-friendly guide on how to install a WordPress plugin.
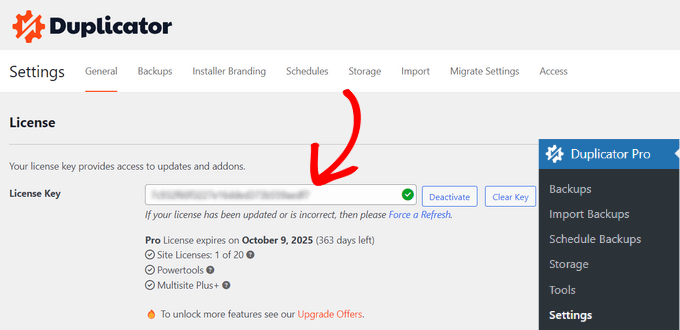
Once installed, you can activate your Duplicator Pro license key. Just head over to Duplicator Pro » Settings in your WordPress dashboard, enter your license key, and click ‘Activate.’ You’ll see a confirmation message when it’s successful.

Step 2: Connect to Amazon S3
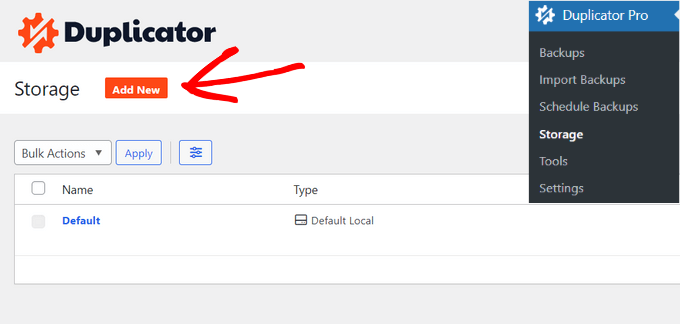
Now, let’s connect Duplicator to your Amazon S3 account. Navigate to Duplicator Pro » Storage and click the ‘Add New’ button.

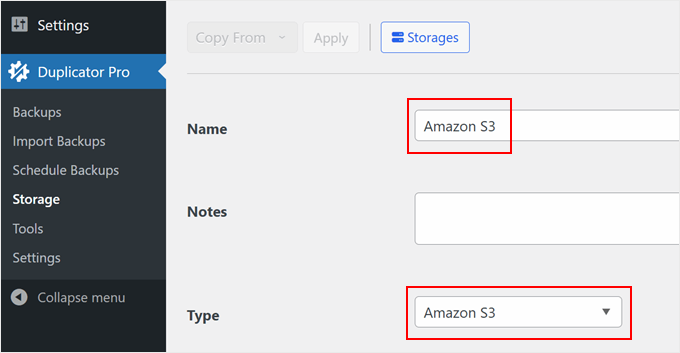
To help you identify this storage connection easily, you can give it a simple name like ‘Amazon S3 Backups’.
Also, look for the ‘Type’ dropdown menu and select ‘Amazon S3.’

Go ahead and scroll down.
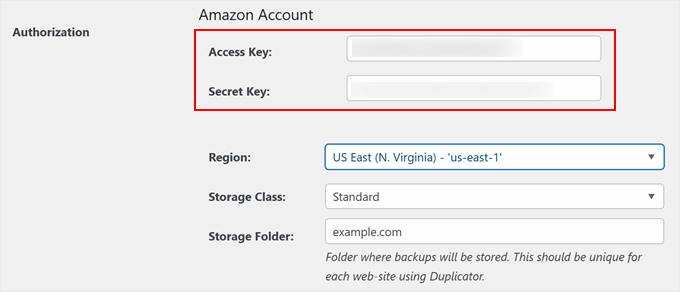
You’ll then see the authorization section where you can paste your access key and secret key that we saved earlier.

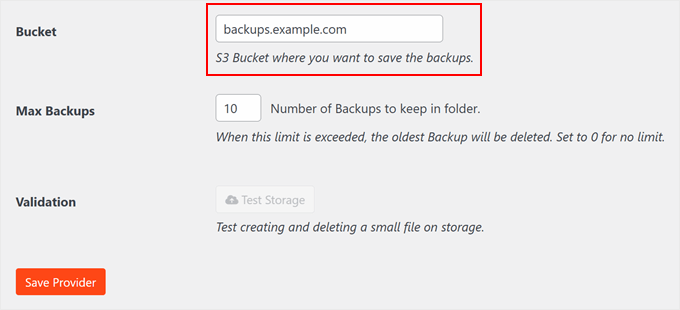
In the configuration section, you need to enter your bucket name exactly as you created it in Amazon S3. This helps Duplicator know where to store your backup files.
You can also decide how many backup versions to keep. If you set this to ’10,’ for example, Duplicator will automatically remove the oldest backup when an eleventh one is created. Setting it to ‘0’ means it will keep all backups indefinitely.
Finally, click ‘Save Provider’ to secure your settings.

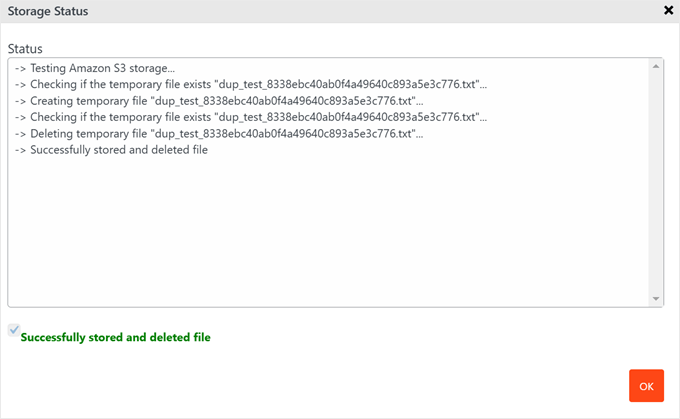
After saving S3 as your new cloud storage provider, the ‘Test Storage’ button will be activated.
You can click on that button to make sure everything works fine.


If the test backup is successful, a popup will appear saying that the plugin has stored and deleted the file.
Feel free to close this popup by clicking ‘OK.’

Step 3: Back Up Your WordPress Site to Amazon S3
Now comes the exciting part: creating your first backup to Amazon S3. Let’s walk through this process step by step.
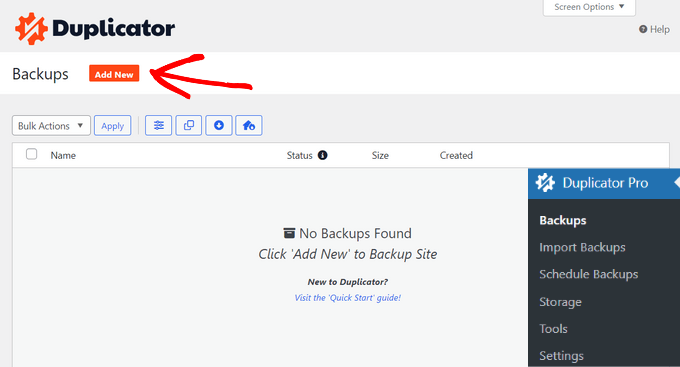
Start by visiting Duplicator Pro » Backups in your WordPress dashboard. You’ll see an ‘Add New’ button. Go ahead and click on it.

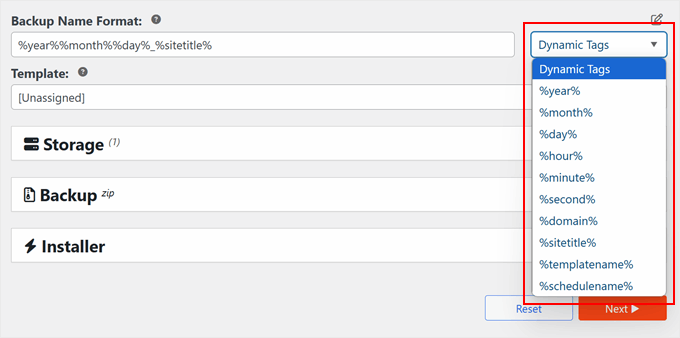
Here’s a helpful tip: You can make your backups easier to find by using a smart naming system.
Duplicator lets you use special tags like %year%, %day%, and %hour% in your backup names. For example, ‘mysite-backup-%year%-%month%’ will automatically create names like ‘mysite-backup-2024-12.’

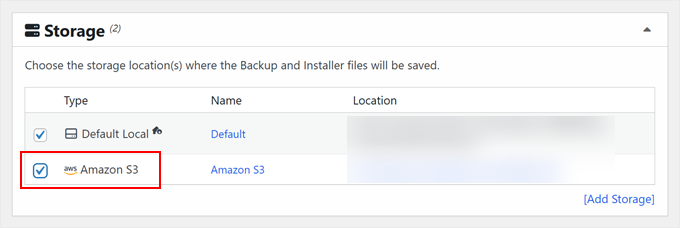
When you scroll down to the ‘Storage’ tab, you’ll see the available local and remote storage options.
Simply check the box next to Amazon S3, and Duplicator will know to send your WordPress backup to S3.

Now, you get to choose what to back up.
Under the ‘Backup’ section, you’ll see several options. We recommend starting with ‘Full Site’ to create a complete backup of your WordPress website files. Think of it as taking a snapshot of everything, like your posts, pages, images, and settings.
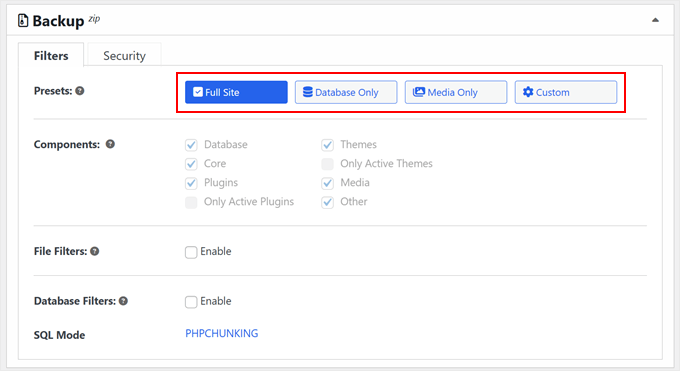

Alternatively, you can choose ‘Database Only’ to back up your WordPress database only.
If that’s your choice, you can read our guide on how to restore WordPress with just a database backup for more information.
Want to add an extra layer of security? Visit the ‘Security’ tab, where you can protect your backup files with a password.
This is especially useful if you’re storing sensitive information.


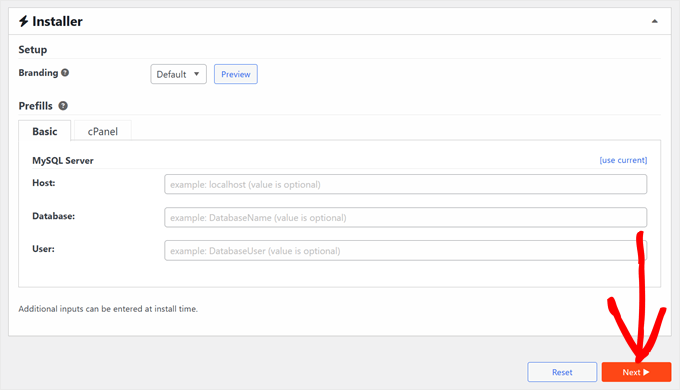
The Installer section comes with pre-configured settings that work well for most websites.
You can leave these as they are and click ‘Next’ to proceed.

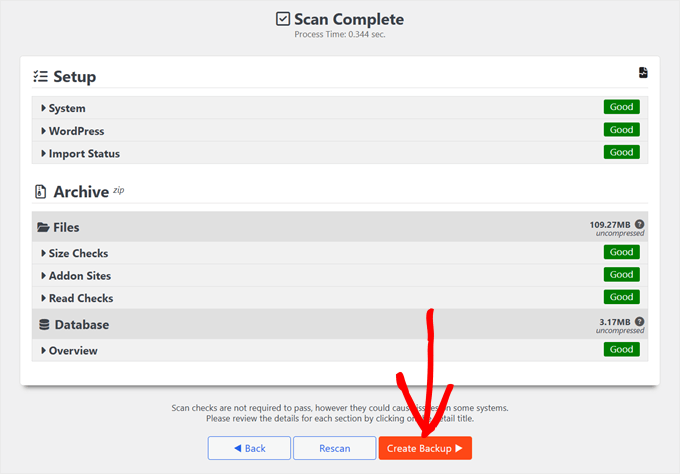
Before creating your backup, Duplicator runs a quick health check of your website.
Think of it as a pre-flight inspection. If everything looks good, then you’ll see a green ‘Good’ status. If there are any issues, Duplicator will let you know exactly what needs fixing.
Finally, click the ‘Create Backup’ button.

When the process completes, you’ll return to your dashboard, where you can view all your WordPress backups.
And that’s it!


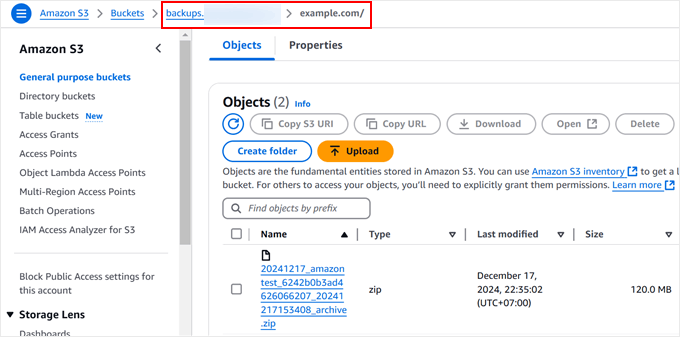
Want to make sure everything worked? You can check your S3 bucket directly.
Just log into your Amazon S3 account, navigate to your bucket, and you should see your fresh backup files waiting there safely.

Method 2: Use UpdraftPlus to Backup WordPress to S3 (Free)
While Duplicator Pro is our top choice, we understand that sometimes you need a free solution. That’s where UpdraftPlus comes in. It’s a reliable free plugin that we’ve tested extensively for Amazon S3 backups.
It’s worth noting that the free version has some limitations. You won’t be able to schedule automatic backups or create redundant backups across multiple locations. But for basic S3 backups, it gets the job done nicely.
Let’s get the free version of UpdraftPlus set up on your site. You’ll need to install the WordPress plugin first through your admin area.
Once installed, you can find UpdraftPlus in your WordPress dashboard. Head over to the ‘Settings’ tab.


This is where you’ll see various backup options.
Scroll down until you spot the cloud storage section, and click on ‘Amazon S3.’
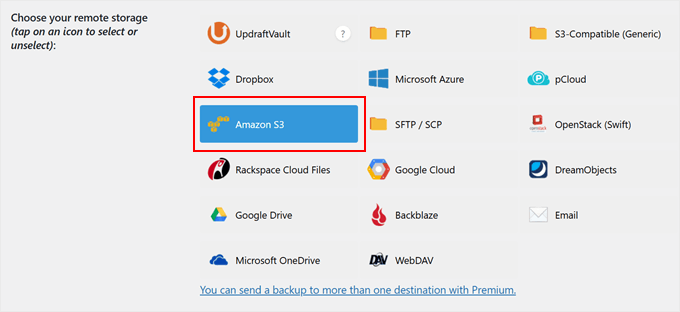

Here’s where those access keys we created earlier come in handy. You can paste your access key and secret key into the respective fields. You also need to enter your bucket name here.
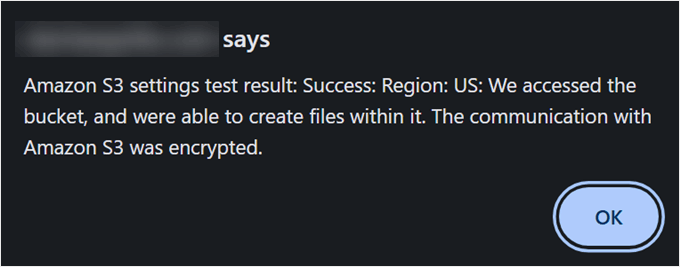
Before moving forward, it’s a good idea to click ‘Test Amazon S3 settings.’ This ensures Amazon S3 is connected properly with this WordPress migration plugin.


If the connection works, you’ll see a push notification with a success message, like in the screenshot below.
From here, you can just click ‘OK’ and save your changes.

Ready to back up your WordPress website? Go ahead and switch to the ‘Backup / Restore’ tab.
Then, click the ‘Backup Now’ button.


A friendly popup window will appear with some options to choose from.
Make sure to check ‘Send this backup to remote storage’ to send your WordPress backup S3. We also recommend ticking both ‘Include your database in the backup’ and ‘Include your files in the backup’ for a complete website backup.
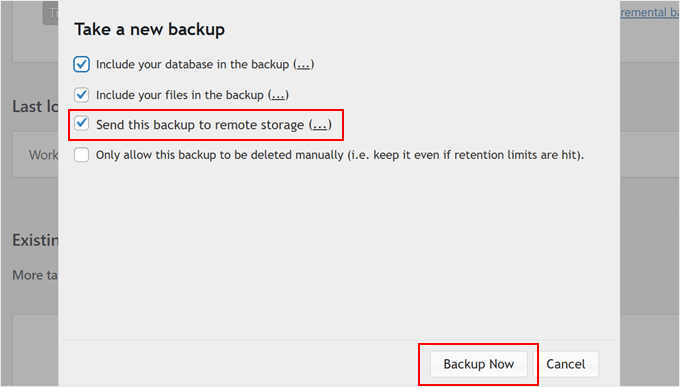

After clicking ‘Backup Now,’ UpdraftPlus will start backing up your files.
Once complete, your backup will appear in the ‘Existing backups’ list. You can scroll down the page to find this section.


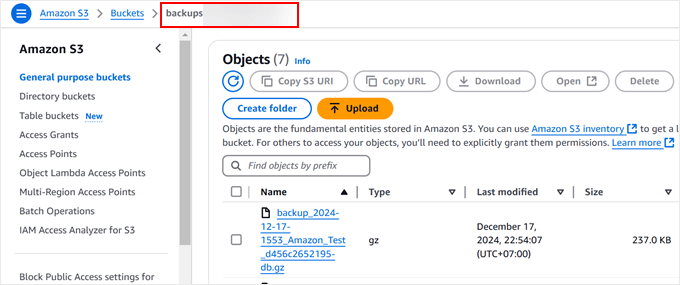
Want to double-check that your backup made it to S3? You can log in to your Amazon S3 account and look in your bucket.
You should see your WordPress backup files stored safely there.

Bonus Tip: Let the Experts Handle Your WordPress Maintenance
Running a successful WordPress website involves much more than just creating great content. Think about all the technical tasks: regular backups, security checks, speed optimization, and endless WordPress updates. It’s like having a second job, isn’t it?
We understand that, as a business owner, your time is better spent growing your business rather than dealing with technical maintenance. That’s exactly why we created WPBeginner Pro Services to take these technical challenges off your plate.

Our WordPress maintenance team can handle everything your website needs to stay healthy and secure:
Daily cloud backups to keep your content safe
Regular WordPress security scans and malware removal
Performance optimization to keep your site running fast
WordPress core, theme, and plugin updates
24/7 uptime monitoring to catch issues before they affect your visitors
What makes our service different? You’ll receive detailed reports showing exactly what we’ve done to maintain your site. Plus, if something unexpected happens, our emergency support team is ready to help.
Think of us as your WordPress technical team. We handle the complex stuff while you focus on what you do best: running your business.
Ready to make WordPress maintenance hassle-free? Book a consultation with our experts today. We’d love to show you how we can help keep your website running smoothly.
We hope this article has helped you learn how to back up your WordPress site to Amazon S3. You may also want to check out our list of the best Dropbox plugins for WordPress and our guide on how to save your WordPress blog posts to your computer.
If you liked this article, then please subscribe to our YouTube Channel for WordPress video tutorials. You can also find us on Twitter and Facebook.

